Micro Hair Extensions Guide: Prevent Bead Loss & Extend Lifespan

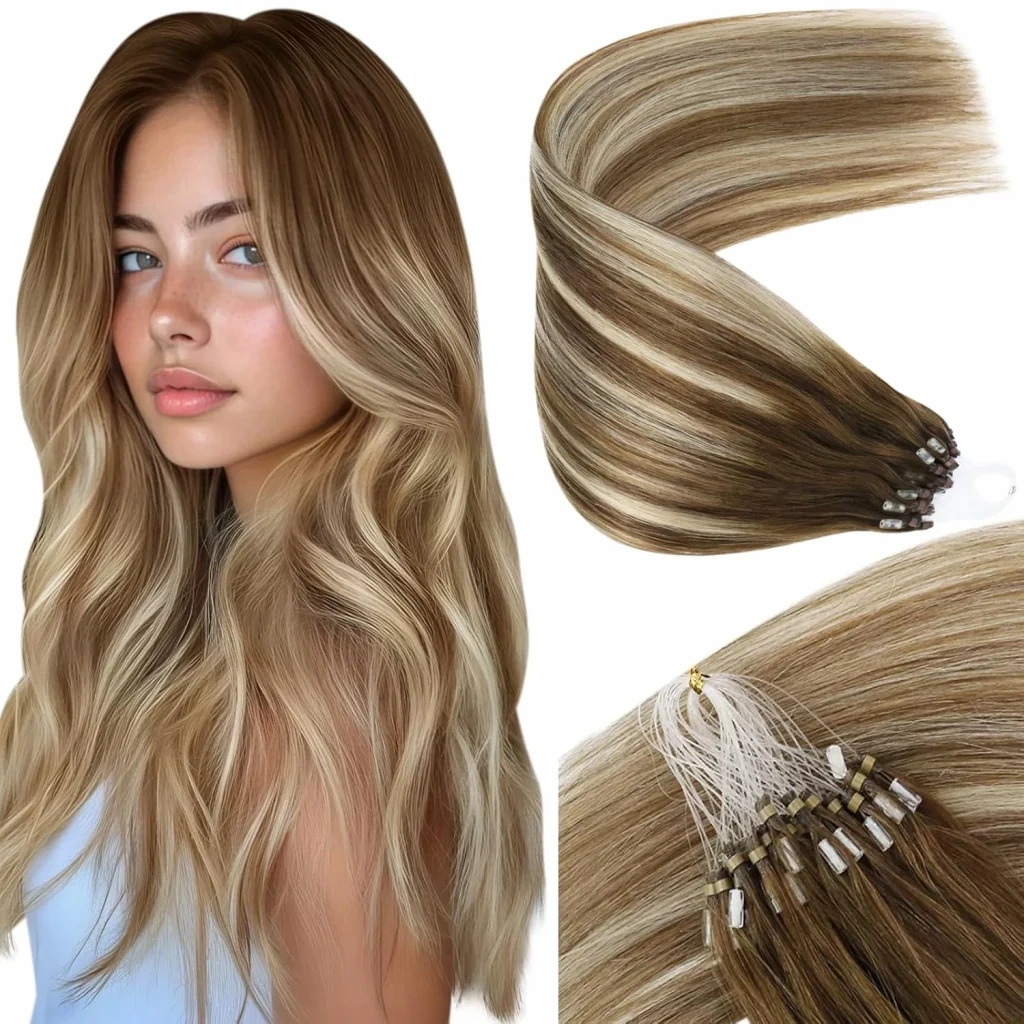
Summary:To prevent bead loss and extend the life of micro hair extensions, proper installation and daily care are key. This guide covers essential steps—from preparing hair with alcohol swabs to securing beads with the right pressure—and offers tips for gentle maintenance. As Allure notes, “The longevity of micro extensions relies heavily on technique, not just the product itself.” Follow these instructions to help your extensions stay secure and your natural hair stay healthy.

Micro hair extensions guide1

1.Preparations before installation

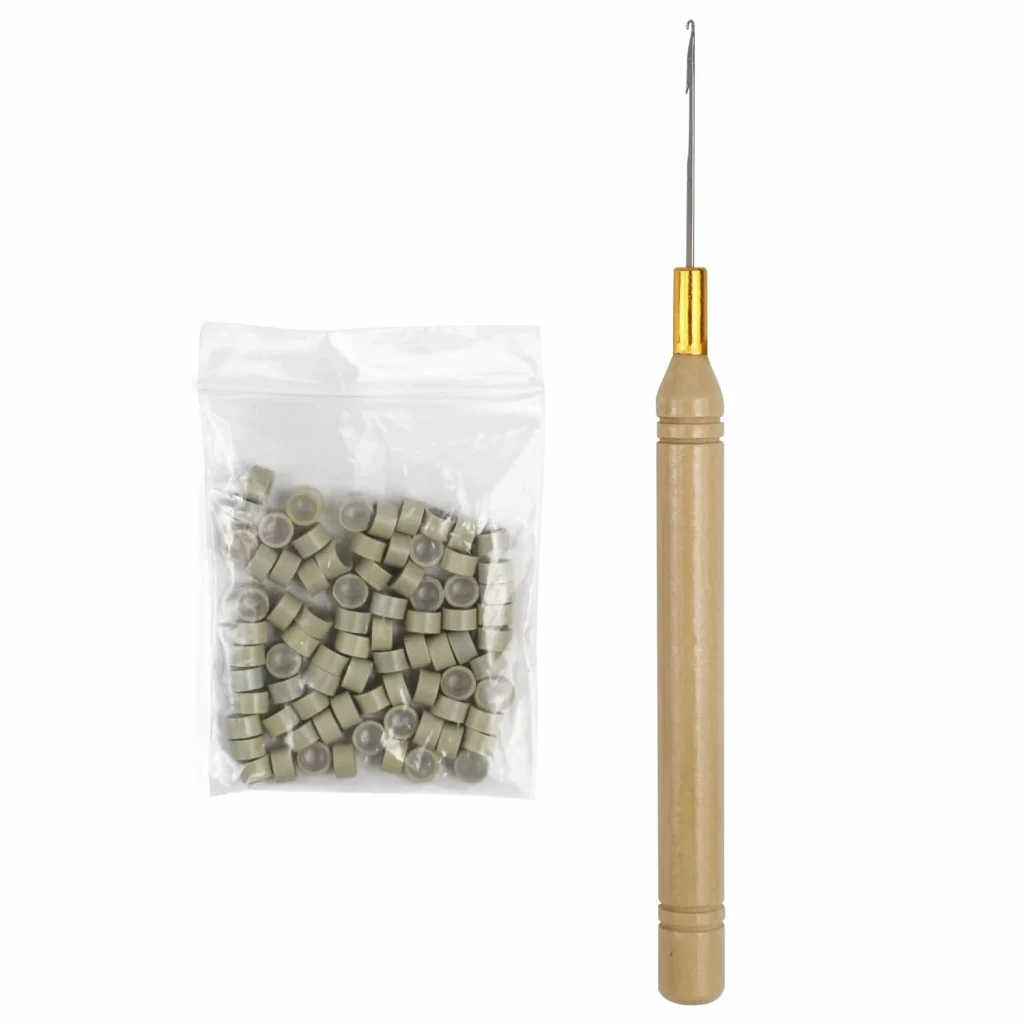
Gather the necessary tools and ensure your hair is clean, dry, and free of any oils or products.1

ToolPurpose
Miniature bead pressersDistributes pressure evenly to prevent bead deformation or a weak hold.
Silicone anti-slip microbeadsIncreases friction with the hair shaft to reduce slippage (features an inner silicone ring).
Tip combCreates precise hair sections to avoid stray hairs interfering with the bond.
Alcohol swabsRemoves oils and dirt from the hair, improving the bead’s grip.

2.Correct installation process

Step 1: Clean & Section

  • Wipe the hair at the intended placement area (1-2 cm from the scalp) with an alcohol swab.
  • Once the alcohol evaporates, use a tail comb to create horizontal sections about 1-1.5 cm wide, working from behind the ear towards the crown.、

Step 2: Thread & Position the Bead

  • Use pliers to open the microbead, then place it over the teeth of your tail comb. Slide the sectioned hair through the bead along the comb’s teeth.
  • Position the bead approximately 1.5-2 cm from the scalp.

Step 3: Crimp the Bead to Secure

  • Hold the microbead steady between your left thumb and forefinger.
  • With your right hand, align the bead-pressing pliers over the center of the bead.
  • Press lightly once to position it, then apply moderate pressure two more times (once on each side) until the bead deforms and conforms snugly to the hair.

Step 4: Check the firmness

  • After crimping, gently tug on the extension hair. If the bead doesn’t slide and no natural hair slips out, it’s secure.
  • If the bead can rotate, it must be re-crimped.
  • Install subsequent extensions in planned zones, spacing each bead 1-1.5 cm apart to avoid tension and weight in one area.

A: This indicates an incomplete crimp. Use your pliers to re-crimp that specific bead until it is fully fixed and immobile.

3.Daily Care & Precautions

Gently comb your hair from the ends towards the roots, avoiding the area around the beads.

Wash gently, lathering the shampoo before applying it to the hair, avoiding direct rubbing of the beads; after washing, gently pat dry with a towel, do not wring.

First, use a low heat setting to dry the roots, then dry the ends. Hold the hairdryer at least 15cm away from the beads, and do not blow directly onto the beads.

You can tie your hair in a loose low ponytail or wear a sleeping cap when you sleep.

FAQs

A: The most common causes are: installing on oily hair, incorrect bead orientation (silicone ring not facing scalp), or insufficient crimping pressure. Revisit Steps 1-3.

A: Address it immediately. A spinning bead will loosen over time and can cause tangling. Re-crimp it with your pliers.

A: A properly crimped bead will be a flattened oval that grips the hair tightly and cannot be spun or slid with your fingers. If the bead looks crushed or misshapen, the pressure was too high.

A: When installed, maintained, and removed correctly, damage is minimal. Key points are: avoiding overly tight placement (tension on follicles), monitoring scalp health, and giving your hair breaks between wears. The American Academy of Dermatology (AAD) advises watching for signs like persistent scalp itching, redness, or unusual hair loss with any extensions and seeking professional advice if these occur.

A: Yes, but proceed with caution. Use dedicated bead-removal pliers or small, pointed tweezers to carefully open the crimped bead. Never pull or yank. If you encounter difficulty, seek help from a professional stylist to avoid hair damage.

Micro hair extensions guide3

Learn More: For comprehensive information on hair health and extension risks, refer to guidance from the

https://www.nhs.uk/tests-and-treatments/cosmetic-procedures
  1. Pro Tip: Using tools designed for microbead extensions (e.g., specific plier models and correctly sized beads) yields the best results. ↩︎
Sunny Beauty

Need help for extensions?

We are here for you!

If you need any help for hair extensions, please feel free to contact us anytime. Our dedicated after-sales team is ready to provide you with the best service! 😊

Collect this post:
Was this article helpful?
YesNo

Leave a Comment

Your email address will not be published. Required fields are marked *

  • Order Help
  • Hair Care
  • Product Info
  • Tape-in Extensions
  • Clip-in Extensions
  • Invisible Wire
  • Pre-bonded Extensions
  • Hair Wefts
  • Hair Toppers
  • Ponytails
  • Accessories
  • Custom Services
Scroll to Top
Privacy Overview

This website uses cookies so that we can provide you with the best user experience possible. Cookie information is stored in your browser and performs functions such as recognising you when you return to our website and helping our team to understand which sections of the website you find most interesting and useful.